Latest Entries »

Mochi Waffles

IMG_0067

Well, this is a shocker – I haven’t posted anything for about a year. In my defense (excuses, excuses), I’ve been fairly busy lately. I mostly spent the past summer & autumn working on my buddy’s food truck, and some other friends opened a ramen shop in December, and I’ve been occupied with working there. On a related note, if you’re in my town, you can pop by the shop and see The Mighty Sumo in action, AND get a tasty bowl of noodles. Win win.

Anyhow, one of my fondest memories of my childhood is sitting at my grandmother’s kitchen table and stuffing my pudgy little face with mochi. Obaa-san’s version was pretty simple; pieces of mochi soaked in a mixture of shoyu and sugar, but damn – it was good.

As I got older, I discovered that mochi had other applications, such as various confectionary treats, and even ice cream. I still prefer the way my grandmother did it, though. Nostalgia is my middle name. Well, actually my middle name is James, which is far easier to spell.

A while back, my friend Carmen threw a photo up on Instagram of something she called a “mochi waffle”; needless to say, I was intrigued. At first, I figured I would cobble together a waffle using sweet rice flour, which can also be used to make mochi. It was a pretty good waffle, and it tasted a little like mochi, but after a confab with Carmen, she mentioned that her original intent was to create a product with a soft, gooey interior like mochi, but with a crispy exterior like one would find on a waffle.

After hearing that, I flexed the muscles of my Google-Fu, and learned of something called a “moffle”, which is simply blocks of cooked mochi placed into a waffle iron.

If you’re not familiar with mochi, there is a fairly involved process in making it; basically you need a team of men with big-ass mallets to pound the crap out of cooked mochi rice (the mochi in that video is green because something was added to it for color; it will be used to make the confectionary treats mentioned above).

Due to process involved, mochi was something that I regarded as a treat, but that may also have something to do with the fact that we only visited the grandparents once a year for the most part. Also, since those visits occurred at New Year’s, and since mochi is one of the osechi-ryori, or traditional New Year’s dishes, it was always present in great quantities during my visits.

Or maybe it was just because Obaa-san knew that I was going to eat a metric crapload of the stuff.

While I quite often enjoy hitting things with large, blunt objects, the traditional method of producing mochi was never really an option for me. I remember Obaa-san and all the other little old ladies talking about mochi making machines when I was a kid, but they were (and still are!) fairly expensive. I also have issues with single purpose kitchen appliances, which puts me at odds with a great number of Japanese devices, lemme tell ya.

About 10 years ago, however, I stumbled across a method for cooking mochi in a microwave, and everything changed. I was able to indulge my mochi craving whenever I wanted to, and believe me, I wanted to. A lot. It’s a pretty simple process – wash 2 cups of mochi rice (also known as Japanese sweet rice) as you would any other type of rice, then soak it for an hour, drain the water, and throw it in a blender with another cup of water (if you own a Vita-Mix, so much the better). Once blended, pour it into a microwave safe dish, nuke it for 10 minutes or so, and BOOM!!! You have mochi. With that in mind, instead of using the microwave, cooking the mochi, and doing a “moffle”, I figured I would just pour the mixture into my waffle iron.

Yeah, sometimes I’m a bloody genius. I ended up with the crispy exterior and gooey interior that Carmen was looking for. I also added a little bit of raw sugar, because waffle. In retrospect, I’ll probably eliminate that addition in the future, as I prefer a savory mochi over a sweetened one.

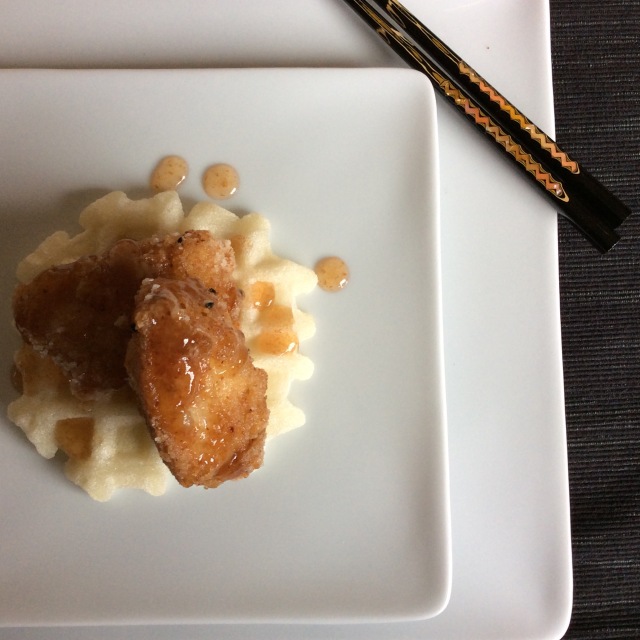
Since I had the waffle, I decided to pair it with my karaage for a Japanese version of chicken & waffles. And, due to all the hanging out I’ve been doing with Michelin star chefs lately, I whipped up an umeboshi (pickled plum) syrup to drizzle over the whole thing.

Gyoza

 photo IMG_0975_zps98b0a145.jpg

So, it’s been four months since I’ve posted anything, at least ‘round these parts. I did a couple of guest posts for a friend’s blog, but I haven’t been able to find the time to come up with anything for myself.

I’ve been busy. Like, really busy. In addition to my regular gig at work, the school also hosted two pop-up restaurant nights for a new local ramen business starting . That was just fun. A whole lot of fun. Great folks, fantastic food, and a warm, fuzzy feeling from helping friends get one step closer to their dream.

I also had to break out mah skillz for the holidays, cooking up a 20 pound turkey and all the fixin’s for Christmas, and churning out a spread for Japanese New Year that would feed an army of sumo.

That last bit segues nicely into today’s subject: gyoza. These beautiful little pouches of happiness can be found on the menus of nearly every Japanese restaurant on the planet. Every restaurant has their own version; mine is the result of years of research and experimentation. I’ve added ingredients, removed ingredients, altered quantities, and just plain messed around with it until it’s reached the point where I’m happy with it.

In the last Japanese class I taught, gyoza were the favorite item on the menu, which kind of surprised me, considering some of the other dishes I broke out, but in the end, all that is important is that the customers are happy.

In any case, without further ado….

3 cups green cabbage, shredded
1/2 tsp salt
1 lb ground pork
2 green onions, minced
3 cloves garlic, grated
1 piece ginger, grated
2 dried shiitake mushrooms
2 tsp aka (red) miso
1 tsp sesame oil
1 tsp crushed red pepper
1/4 tsp sugar
wonton wrappers

Shred cabbage and combine with salt in a large bowl. Leave for ten minutes, then squeeze handfuls of cabbage, removing most of the water. Using a microplane, grate the shiitake into another bowl, then the cabbage and the rest of the ingredients and mix everything together with your hands until well combined.

Place about 1 tsp of mixture on to wonton wrapper. In a small bowl, make a paste with cornstarch and water, and use the paste to wet the edges of the wonton wrapper. Pull the edges of the wrapper towards the center, and pleat into a half moon shape.

Heat oil in a non-stick skillet over medium heat. Add gyoza and sauté until the bottoms are brown. Add water to the gyoza about 1/4 of the way up. Cover tightly and cook about 6 minutes, or until the water is completely gone. Continue to cook uncovered for another minute or so to crisp the bottom. Serve with sauce.
Gyoza can be served with a variety of dipping sauces; like the dumplings themselves, every joint has their own version. The most popular choice is usually rayu, or chili oil, but I came up with something I like a little more:

3 tbsp shoyu
1 tbsp sake
3 tbsp vinegar
1 tsp tobanjan

Mix everything together and serve.

 photo IMG_0940_zps980bb6a6.jpg

When I woke up this morning, it was bloody friggin’ cold, which I suppose is to be expected at the end of August here in Canada. After nearly two months of temperatures in the mid to high 20’s, waking up to a 6 degree morning was less than pleasant.

(For any non-metric folks out there, think 77 F to 42 F.)

Colder weather always seems to put me in the mood for some form of comfort food, and few things are as comforting to me as macaroni & cheese. I’m not talking about that crap that comes in the box with the powdered “cheese”, but actual, honest-to-goodness mac & cheese, made from scratch.

I’ve made plenty of mac & cheese in my life, a fact in and of itself that demanded that I try something different. Originally, I intended to create a variation based on a classic cheese fondue, with Gruyere, Emmentaler , and Appenzeller, but to my dismay, I learned that my cheese shop closed its doors permanently. Sumo being Sumo, I employed my superior improvisational skills and came up with a new plan.

It goes without saying that the new plan was entirely dependent on the types of cheeses I was able to find in the grocery store, but I was able to find some that I like, so it all worked out.

8 oz dried pasta (I used shells)
4 tbsp unsalted butter, divided
2 tbsp flour
½ tsp salt
½ tsp dry mustard
Couple pinches of freshly ground pepper
Couple dashes of sweet paprika
2 cups whole milk

grated cheddar cheese, about 2/3 cup
grated mozzarella, about 2/3 cup
grated Emmentaler, about 2/3 cup
½ cup seasoned bread crumbs

Cook the pasta according to package directions and drain. Place cooked pasta in a large bowl.
Preheat the oven to 400° C.
Melt 2 tbsp butter in a large saucepan over medium heat. Add flour and salt and whisk until mixture is bubbly. Stir in the dry mustard, ground pepper, and paprika. Add milk gradually, whisking constantly.
Cook over low heat, whisking constantly until thickened.
Reserve ¼ cup of each of the cheeses. Add the rest to the saucepan with the milk and stir until melted. Add the cheese sauce to the cooked pasta and mix until it’s evenly coated. Transfer the pasta to a 9×7 inch baking dish. Sprinkle with the reserved cheese.
Melt the remaining butter and combine with the bread crumbs and mix well. Sprinkle over the cheese topping. Bake until hot & bubbly, 15 to 20 minutes.

 photo IMG_0930_zpsd0efc24f.jpg

I’m not really much of a “fancy drinks” guy. Put a beer (or three) in front of me and I’m a happy, happy Sumo. I’m slowly becoming more versed in the area of wine, but I still don’t know much about it. As far as mixed drinks go, I actually know a fair bit about them, as I was a bartender back in the day, but they’re not my first choice of beverages.

That being said, lately I’ve noticed that some of my friends and fellow bloggers have been posting their current favorite summer drinks, so I figured I’d pull a trick out of my hat that I haven’t used since I was a kid – The CopyCat Gambit.

I found the recipe for this drink a while back, labelled as a “Japanese Summer Breeze”. Obviously, the name grabbed my attention by the short hairs right away, but I didn’t bother with testing it at the time, I just added it to my ever-growing catalog of “Things To Try at Some Unspecified Future Date”. Once I made the decision to jump on the summer drink bandwagon, I dug out the specs and took a closer look.

About the only thing I could see that made this a “Japanese” drink was the inclusion of matcha, or powdered green tea. The booze in this drink (vodka) didn’t really speak to my Japanese soul at all, so there was really only on option – I decided to switch it out for sake. Sake has a much lower alcohol content than vodka, but it’s Japanese, and that’s the important bit here.

Not too surprisingly, I had both matcha and sake on hand, as well as the other ingredients, raw sugar and a couple of limes. A little measuring, pouring, and shaking later, I had a relatively tasty, if somewhat unattractive beverage. The matcha gave the beverage a sickly, greenish color that reminded me of week-old swamp water. Not exactly appetizing, to say the least.

Not being able to leave it alone, I went back to the drawing board and tried to figure out how to fix it. I decided to utilize a different type of tea, called genmaicha. This variety of tea is a combination of green tea leaves and roasted brown rice, which when brewed, has a lovely, clear golden color.

Before I had a chance to try the new tea in the drink, I happened to find myself on a shopping trip with my homegirl Michelle Peters-Jones, the owner and food goddess of The Tiffin Box. Mich needed to procure some wine, so we paid a visit to Aligra Wine & Spirits. While mi hermana picked out her wines, I spent a few minutes browsing the store, and managed to find a fuji apple flavored sake. I had no idea such an item even existed, but I immediately began considering the possibilities for my current experiment. After a brief moment, I figured that the end result would be bloody friggin’ spectacular.

As it turned out, I was right, as I usually am. The fuji apple sake paired beautifully with the genmaicha, and the lime added the perfect amount of brightness to the drink, resulting in a light, refreshing libation for the hot summer days (or nights!) here in Alberta. Out of respect to the original recipe, I have named this drink Kunpū, which is, of course, Japanese for “summer breeze”.

2 oz fuji apple flavored sake
6 oz genmaicha
1 oz raw sugar
Juice from 1 lime
Add all ingredients to a cocktail shaker. Shake and strain into a martini glass. Garnish with Japanese mint. Or plain old regular mint, if you can’t find Japanese mint.

For a non-alcoholic version, substitute the sake with 2 oz of apple juice.

Miso

 photo IMG_0923_zps585c6b41.jpg

Umami. The fifth taste. These are the experiments of the kitchen of Sumo; his continuing mission to explore flavors, to seek out new dishes, to boldly cook what no man has cooked before!

Ok, that last bit isn’t true; I just threw it in for dramatic effect. And yes, I was watching “Star Trek” before I started writing this.

The word “umami” is, not surprisingly, a Japanese term that is yawningly described as “the scientific term to describe the taste of glutamates and nucleotides”.

Yeah, I have no clue what that means, either. The only science stuff I’m any good at relates to the psychological and physiological effects of combat and high stress situations on the human body.

Fortunately, the Japanese have saved us from dreary scientific terminology. The more poetic translation of umami is “pleasant savory taste”, which is a little more interesting to my way of thinking. Then again, I’m not exactly objective in these matters.

Umami can be found in a variety of foods, such as anchovies, parmesan cheese, and soy sauce. Basically, any type of fermented food contains umami. One of my favorite examples of this is miso.

Miso is a Japanese seasoning made from fermented soy beans. It’s rich, thick, and salty, and imparts boatloads of umami into anything it’s combined with. Traditionally, and arguably the most popular use for miso is in (drumroll) miso soup. Don’t misunderstand me; I love miso soup, but when it comes to subjects for me to write about, it doesn’t quite have the flair, the panache, or the style.

A while back, I came across a recipe for miso paste, which was described as a marinade for meat or as a dipping sauce. While both of those sound like good ideas, I like to try to be a little more adventurous with my experimentations, and decided to try it on a variation of yakitori.

I wanted to explore versatility of miso a little more, so a quick Google search led me to this brilliant concoction. Going to be honest here – the chicken was pretty good, but those potatoes, GOOD SWEET ZOMBIE JESUS, THOSE POTATOES!!!!!! I would cheerfully kill a man for a plate of those potatoes.

Miso Yakitori

Miso paste
13 oz awase misoAwase is essentially a blend of aka (red) and shiro (white) miso. If you can’t find awase, just use equal amounts of aka and shiro.
1/2 cup sake
1 cup mirin
1/3 cup superfine sugar

Mix the ingredients together in a saucepan over medium heat. When it comes to a boil, turn the heat down low. Continue cooking for about 20 minutes, stirring as the liquid reduces so that it doesn’t burn, then remove from the heat. When cool, place in a container and keep in the refrigerator.

1 1/2 lbs boneless, skinless chicken thighs
bamboo skewers, soaked in water for at least 1 hour
salt
1/2 cup miso paste

Cut the chicken into 1/2 inch wide strips, then fold in half and thread onto the skewers. Leave about 1/2 inch at each end of the skewer. Press down lightly on the chicken with the palm of your hand, then sprinkle lightly with salt.

Place the sauce in a small bowl with a pastry or barbecue brush.

Detailed instructions on how to set up a grill for yakitori can be found here.

Place the skewers onto the grill (or bricks, if using), and turn every 1 minute or so as they brown. Once the meat is lightly browned and you can see it sizzling, brush the miso paste on top. Grill for about 2 minutes more, turning about every 30 seconds and brushing more paste on each time. Transfer the chicken to a platter and drip more paste on top, and serve immediately.

If you missed it the first time, the recipe for the potatoes can be found here. Since it’s not my recipe, I’m not comfortable with posting it here, lest it appear that I’m trying to take credit for it.

Yakitori

 photo IMG_0054_zpss7hdlbw6.jpg

I realized the other day that I never did get around to mentioning that after a couple of guest appearances at Get Cooking Edmonton, I was offered a job. This may come as a bit of a shock, but I teach the Japanese class.

I know, right? Who would have guessed?

In any case, during the last class, one of the clients asked me about yakitori, which was not on the menu, and I told everyone that I would email them a recipe for it in a few days.

Then I forgot all about it. I didn’t give it a second thought until the GCE admin lady forwarded me an email she had received from one of the clients, asking when I was finally going to get off my ass and keep my promises.

Just so we’re clear, I paraphrased that last bit. The email was actually very polite.

Yakitori is not something that my grandmother made for us. I think the first time I ever tried it I was 11 or 12, and my parents had taken me out to a Japanese restaurant. Back then, I was kind of a picky eater, so I examined every menu item carefully in order to find something that I would actually eat. The idea of grilled chicken seemed pretty safe, so I made my choice, and was hooked for life.

The word yakitori literally means “grilled bird”, but it can also include beef, pork, duck, and vegetables. Basically, if you can fit it on a skewer, it’s yakitori. That being said, chicken is the primary ingredient. And in Japan, that means ALL of the chicken – breasts, thighs, legs, liver, gizzard, the neck, heart, and even the skin.

Maybe it’s my North American upbringing, but I find the thought of eating some of those bits kind of repulsive. Let’s just stick with the breasts and thighs, mmkay?

The “trick” to cooking yakitori is grilling the chicken partially, coating it with tare (it means “sauce”), and then grilling the coated chicken. So, you’re grilling both the chicken and the sauce, giving it a double carmelization and infusing it with a ton of umami.

Like nearly everything in Japanese cuisine, yakitori is not difficult to make at home; all you need are a few basic staples, and a way to actually cook the dish. In Japan, yakitori is cooked on a special grill called a konro, a rectangular shaped, fireproof ceramic box, which uses (naturally) a special type of charcoal called binchotan, which is made from the branches of the Japanese oak.

Binchotan is costly to produce, as only oak trees of a certain age can be harvested, and the oak is then fired in an earthen kiln for about a week.

The konro is long, narrow, and deep, which makes it easy to pile in the binchotan, concentrate the heat, and suspend the skewers over the coals without roasting the flesh from your hands in the process. The konro has a removable wire grid, so the skewers can be placed directly on the grid, or it can be removed and the skewers suspended directly over the coals.
 photo konro_zpsbdba441b.jpg

While it would be nice to cook yakitori in the traditional manner, it is not necessary to own a konro. If you have a barbecue, you’re good to go. If you want to simulate the konro technique, you can approximate it with a few bricks and some heavy duty aluminum foil.
 photo IMG_0752_zps15941007.jpg

If you don’t want to bother with that, simply measure a sheet of aluminum foil to match the length of your grill and fold it in half. Place the folded sheet on one side of the grate, and place the skewers on the grate so the exposed ends are resting on the aluminum foil, and the meat ends are over the fire. The foil will prevent the skewers from burning.

It goes without saying, but brush and oil the grate before starting the grill, otherwise the meat may stick to it.

Yakitori Tare (sauce)

Bones from 1 chicken (carcass & leg bones, coarsely chopped; bit of meat and skin are fine)
2 cups mirin
2 cups shoyu
1 cup sake
1 cup water
2 tbsp packed brown sugar

Preheat an oven broiler. Arrange the chicken bones in a roasting pan and place under the heat. Broil until the bones are browned, about 5 minutes on each side, using tongs to turn the bones over.

Transfer the bones to a large stockpot. Add the mirin, shoyu, sake, water, and brown sugar. Bring to a boil over high heat. Decrease the heat to low and simmer, uncovered, until the liquid is reduced by half and becomes nice & glossy (at least 1 hour). Strain to remove the bones and any optional ingredients (see note) and discard. Let the liquid come to room temperature and use.

If you don’t have a chicken carcass handy, substitute 1 cup of chicken broth (it’s perfectly fine to use the store bought stuff – use the low sodium variety) for the cup of water, and simmer as directed above.

Note: Add one or more to the stockpot with the other ingredients: 3 to 5 crushed garlic cloves, 1 bunch green onions, 1 to 2 oz fresh ginger, thickly sliced; 1 to 2 tsp freshly ground pepper or ichimi togarashi.

Yakitori

1 1/2 pounds boneless, skinless chicken thighs
16 large, thick green onions(scallions), trimmed
bamboo skewers
salt
1/2 cup yakitori tare

Soak the bamboo skewers overnight in water.

Cut the chicken into 1/2 inch wide slices. Cut the onions into 1 inch long sticks.

Preheat the grill to medium-hot heat.

Fold the chicken slices in half and thread on to the skewers, alternating chicken, onion, chicken, etc until the skewer is full. Press down on the completed skewer with the heel of your hand to compress the ingredients. Lightly sprinkle both sides of the ingredients with the salt.

Place the sauce in a small bowl with a pastry or barbecue brush.

Place the skewers onto the grill (or bricks, if using), and turn every 1 minute or so as they brown. Once the meat is lightly browned and you can see it sizzling, brush the sauce on top. Grill for about 2 minutes more, turning about every 30 seconds and brushing more sauce on each time. Transfer the chicken to a platter and drip more sauce on top, and serve immediately.

Part of my duties at Get Cooking include helping to update the company blog, so if you’re interested in reading more of my pointless babbling, you can find it here.

Ramen

So the weather here in Canada is starting to get colder (funny how that always seems to happen at the same time every year), and naturally, my convoluted little mind starts to turn to dishes that tend to have a warming effect, as do most of my countrymen’s (and countrywomen’s) less convoluted minds.

Occupying a spot fairly high on that list is ramen. Ramen is Japanese comfort food at its best, essentially the equivalent of fried chicken, cheeseburgers, and pizza all rolled into one.

Except, y’know…without the disgusting mess you would get by trying to mash all three of those together.

When most folks in North America think of ramen, what comes to mind are those blocks of dried noodles – add hot water, wait a couple of minutes, then snarf ‘em down. Well folks, Sumo is here to tell you that those dehydrated abominations have about as much in common with authentic ramen as a Big Mac does with filet mignon.

The word ramen describes both the noodles used in the dish and the dish itself. You can usually find dried or frozen ramen noodles in Asian grocery stores; either version is fine. You could also look for fresh chow mein noodles in the Asian groceries, which are – surprise surprise – ramen noodles. Like many facets of Japanese culture, ramen was adapted from Chinese origins.

There are a plethora of different versions of ramen all throughout Japan, but one of my favorites comes from Hokkaido, the northernmost island. Hokkaido has a climate similar to that of most of Canada, which means that they’re familiar with the cold, just like we are.

Which brings us back to where we started – food that warms you up. I found the inspiration for this one in a book by Chef Takashi Yagihashi. If you’re a fan of Top Chef, you might have seen him on Season 4. From what I know of him, Yagihashi itamae is just brilliant in the kitchen, but he has a tendency to be a bit “chef-y”, as my friend and mentor Kathryn would say. I simplified it a bit, mainly since I’m kind of lazy.

Yagihashi itamae provides a recipe for ramen chicken stock, which is great if you have the time and inclination to make chicken stock from scratch. Unfortunately, most days I have neither. So, I improvise. I adapt. I think up creative ways to approach the conundrum.

In other words, I cheat. Instant chicken broth, baby! Add a couple of teaspoons to boiling water and you’re set. To make it into an approximation of Yagihashi itamae’s ramen chicken stock, throw in a couple of smashed garlic cloves, some ginger, a bit of sake, some konbu and let it steep for a while.

Yes, yes – I’ll provide more precise measurements in a minute.

Even with the cheating, this is a fairly involved process. If you want to get an idea of how much work is involved (without making it yourself!), check out the film “The Ramen Girl” starring the late Brittney Murphy. It’s a horrible movie, but it does provide a fairly accurate portrayal of how seriously authentic ramen is treated in Japan.

Since I can’t think of any more bad jokes, let’s get started, shall we?

Ramen chicken stock (Sumo’s cheat version)
9 cups chicken stock
5 cloves of garlic, chopped in half
1 one inch chunk of ginger, smashed
1 piece of konbu, rinsed under cold water
1/4 cup sake

Add all ingredients to the chicken stock and simmer for 30 minutes. Strain through a fine mesh sieve.

Miso base:
2 tbsp sesame oil
1/2 cup chopped onion
2 tbsp grated ginger
1/4 cup minced garlic
1/2 pound ground pork
1/2 cup shiro miso
1/4 cup aka miso
1/4 cup ground sesame seeds
5 tbsp hoisin sauce
1 tbsp tobanjan
3 tbsp shoyu or tamari

Combine the sesame oil, onion, ginger, and garlic in a small saucepan over medium-low heat. Cook for 6 minutes or until everything is soft and fragrant, about 5 or 6 minutes. Mix in the ground pork and increase the heat to medium. Cook for 6 to 7 minutes, or until the pork is cooked through.

Stir in both miso varieties, the sesame seeds, hoisin sauce, tobanjan, and shoyu and bring to a boil. Turn off the heat and set aside. Leftover miso base will keep in the fridge for 1 week or frozen for up to 2 months.

Miso ramen:
8 cups ramen chicken stock
2 tbsp vegetable oil
8 cups bean sprouts
2/3 cup garlic chives, cut into 1 inch lengths
4 (7 ounce) pieces frozen ramen noodles, or equivalent fresh or dried ramen noodles
1/2 cup (drained) canned sweet corn
4 tsp ground sesame seeds
Pinch of sansho
2 green onions, thinly sliced on an angle

Combine the ramen chicken stock and 1 cup of the miso base in a pot over high heat. Bring to a boil, then reduce the heat to low and cover to keep warm.
Heat the vegetable oil in a large, wide bottomed pot over high heat. Add the bean sprouts and garlic chives and cook for about 1 minute, stirring often. Add the miso broth and bring to a boil. Cook for 1 minute, then turn off the heat.
Cook the ramen noodles according to package directions. Drain well and divide equally among 4 large bowls. Top each with one quarter of the broth and vegetables. Garnish each bowl with 2 tbsp of the corn kernels,, 1 tsp of the sesame seeds, the sansho, and one quarter of the green onions.

When I made it, I had some Chinese style barbecue pork in the fridge, so I threw a few slices on top, just because. Also, to my great embarassment, I forgot to procure the canned corn. And bean sprouts. So I threw some shiitake in instead. YMMV.

 photo Miso_zps7dca0997.jpg

Pain……perdu, that is.

Alas, no nihonryouri this time. I’ve got outlines for some Jap food blog entries in my head, but right now, I felt like sharing one of my favorite breakfast dishes.

Mainly since I just finished eating it, and I realized that I haven’t updated this bloody thing for two months. Oops.

Anyhow….pain perdu. If you no speaka ze French, it means “lost bread”. As in, bread that’s gone stale, but is still more or less edible. And, if you don’t speak French, it’s pronounced “pan perdue”.

You might be familiar with a dish called “French toast”; if so, then prepare yourself for a revelation – this is pretty much the same thing.

Yes, French toast was invented by the French. Who would have guessed?

Sadly, I didn’t think of taking any pictures until I was finished. Because I was hungry. Because I hadn’t eaten anything since about 1900 hrs on Saturday. BUT, I did have the presence of mind to snap a pic before I snarfed it all down, so that’s something, I guess.

Now that the obligatory bad jokes are out of the way, on with the show.

You will need:

2 eggs
1/2 cup milk
pinch of salt
1 tsp sugar
1 tsp vanilla
1/2 tsp cinnamon
1/4 tsp allspice
6 thick slices of day old French bread (staler bread is fine as long as you can slice it)
3 tbsp butter
1 tbsp vegetable oil
powdered sugar (optional)

In a mixing bowl whisk together the eggs, milk, salt, sugar, vanilla, cinnamon, and allspice. (I’ve found that putting the egg mixture into a large baking dish will make the next couple of steps a lot easier.)
Slice the bread into thick slices, at least 1-inch thick and add to the egg mixture.
Toss the slices until all the mixture has been absorbed into the bread. Depending on how stale the bread is this may take from 5 to 10 minutes.
In a large non-stick skillet, over medium heat, very lightly brown the slices in the butter and oil for about 2 minutes per side.
Transfer to a baking sheet and bake at 400 degrees F. for 10 minutes.
After 10 minutes remove, turn over and put back in the oven for another 5 minutes to brown the other side.
After 10 minutes on one side and 5 on the other the custard should be cooked on the inside, and the French toast will be crisp on the outside. If it looks like it needs more time cook it longer, but be careful not to cooked very dark as the egg custard may become bitter.
If desired, sprinkle powered sugar on top before serving.

Obviously, I found this recipe somewhere (online, I think), and adapted it slightly to my own prefences. YMMV.

Enjoy!

 photo IMG_0727_zps6f863d68.jpg

In keeping with my renewed interest in nihonryouri, I decided to play around a bit with sushi.

I’m not exactly a sushi fanatic; put it in front of me and I’ll eat it, but I generally don’t bother making it myself. There are a couple of reasons for that – first, when it comes to family get-togethers, my father takes on the role of the sushi itamae (chef). For whatever reason, the old guy likes spending hours cooking rice, slicing fish, and rolling nori.

Secondly, I don’t particularly like nori. Don’t get me wrong, I am not repulsed by it or anything like that, but it’s not going to be the first thing I think of whenever I’m hungry.

But, as I’ve been told once or twice, the world does not revolve around me. Folks want to learn how to make sushi, so I need to brush up on my sushi making skills, end of story.

Well, not really. If it were the end of the story, then this would be a really short blog post.

In any case, I decided that I needed to put my own spin on things, since any schmuck (no offence, Dad!) can make sushi with tuna, or salmon, or…..well, you get the idea.

So, I decided to go with supaishii kani, or spicy crab. Now, spicy crab isn’t exactly unheard of in the sushi world, but every version I’m familiar with uses sriracha as the heat element. I’m a Japanese man, I was making a Japanese dish, and by Inari, I was going to use Japanese ingredients!

(Inari-no-Kami is the Japanese god of food. Bit of a geek moment, sue me)

To that end, I came up with the brilliant idea of making a tobanjan aioli to mix in with the crab meat. Tobanjan is a paste made from fermented soybeans, rice, and chilis. A sort of spicy miso, for all intents and purposes. It’s also known as doubanjiang in Sichuan cuisine. It’s hot. Like, really hot.

The aioli idea was a direct result of a burger that I had eaten the week before. No, seriously. I went to a restaurant that offers a “build your own burger” option, and one of the toppings was a chipotle aioli, so my twisted little mind figured that I could substitute one spicy element for another. It was a good idea in theory, but…..I hit a snag.

I discovered that aioli, in any flavor, is damned bloody hard to make. I found a nice egg, beat the hell out of it, then added about three drops of oil and continued to beat the mixture together, until it looked like it was ready. I then started to add the rest of the oil with one hand while I worked the whisk with the other, waiting for my aioli to emulsify.

Didn’t happen. Didn’t happen the second time I tried, either. Nor the third. Eventually, I decided to quit before I ran out of eggs, and tried to figure out what I was going to do. Then it hit me – Japanese mayonnaise.

No, I was not attacked by Japanese mayonnaise, I just remembered that I had some in the refrigerator. If you’re not familiar with it, Japanese mayonnaise is made with either apple cider vinegar or rice vinegar, as opposed to the distlled vinegar found in “western” mayonnaise, which gives it a very different flavor. The Japanese version also tends to be thinner in texture.

Anyhow…..I had Japanese mayo, I had tobanjan, and in short order, I had a spicy, aioli-like substance to add to the crabmeat that I had procured from the grocery store. REAL crabmeat, not that imitation crap. I mixed it all together, then started assembling the maki.

 photo Spicycrab1_zps050be3d8.jpg

I didn’t really measure anything, since I was merely trying it out, but to the best of my recollection, it went something like this:

6 oz crabmeat
4 tbsp Japanese mayonnaise
2 tbsp tobanjan

 photo Spicycrab3_zps77ffc21b.jpg

Once that is done, pop the mixture into the refrigerator while you get your sushi rice together:

2 cups cooked Japanese short grain white rice (1 cup uncooked rice makes 2 cups cooked)
Sumo’s sushi seasoning syrup

Oh, you never heard of Sumo’s sushi seasoning syrup? Well, it’s not a secret. You can actually buy something similar:
 photo mizkan-seasoning-355ml-2_zps30efd421.jpg

If you want to make it at home, add 1 cup of rice vinegar, 1 cup of sugar, and 1 1/2 tablespoons of salt in a small saucepan and cook until the sugar and salt dissolve. Let it cool to room temperature before using.

Moving right along, place the cooked rice in a large, non-metallic bowl and drizzle a couple of tablespoons of the syrup over the rice as you gently spoon the rice from the bottom of the bowl up to the top, continuing until all of the syrup is incorporated into the rice.

If you don’t know how to roll makizushi, I found a random instructional video to help you out, since I’m too lazy to type it out myself.

I can tell you just by looking at the rice, that girl was NOT using Sumo’s sushi seasoning syrup. Or even the bottled stuff. When you use the syrup, your rice takes on a beautiful, glossy sheen that is quite visually appealing. The rice sticks together better, too.

Anyhow, in addition to the crab mixture, I decided to throw in some avocado to balance out the heat a bit:
 photo Spicycrab7_zps30e41116.jpg

 photo Spicycrab8_zpsd4d1fd89.jpg

 photo Spicycrab9_zpscda7cd97.jpg

And, after some nifty knife skills,
 photo Spicycrab10_zps047871ce.jpg

While I still don’t particularly care for maki, I’ve already begun to think up new applications for the crab mixture, so I suppose this little experiment was not in vain.